How to set delivery charges by region in StoreOS
Delivery charge setup for an online store in Bangladesh: add Dhaka and outside-Dhaka regions, set each fee in BDT, and save, with annotated console screenshots.
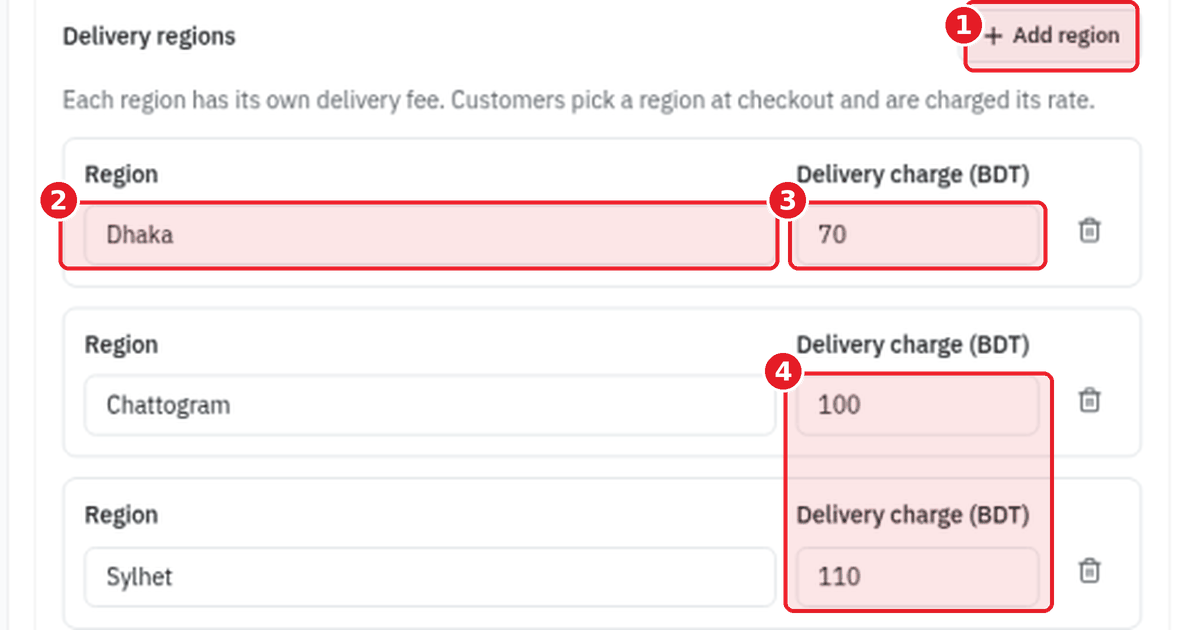
Delivery charge setup for an online store in Bangladesh comes down to one question: what does a customer pay to get a parcel to their door, and does that change by place? For most sellers it does. Dhaka is cheaper. Everywhere else costs more.
This guide walks through the Charges page in the StoreOS console, step by step, using real screenshots. By the end you will know where each delivery region lives, how to change a fee, how to add a region, and where the tax rate sits.
If you are still deciding what to charge, read how to think about delivery charges for ecommerce in Bangladesh first. This post is only about the clicks.
A note before we start: the screenshots come from a sample store called Rangdhonu Crafts on the Free plan. The fees you see (Tk 70, 100, 110, 125) are sample values, not recommendations. Use your own courier rates.
What you need before you start
- A StoreOS store. If you do not have one, create a free store.
- Your actual courier costs for Dhaka and for each other division you ship to.
- A decision on whether you want one flat price outside Dhaka or a different price per division.
Step 1: Open the Charges page
In the console, go to Settings and then Charges. The breadcrumb at the top of the page reads Dashboard, Settings, Charges, and the page subtitle says "Delivery fees and tax rate for checkout."
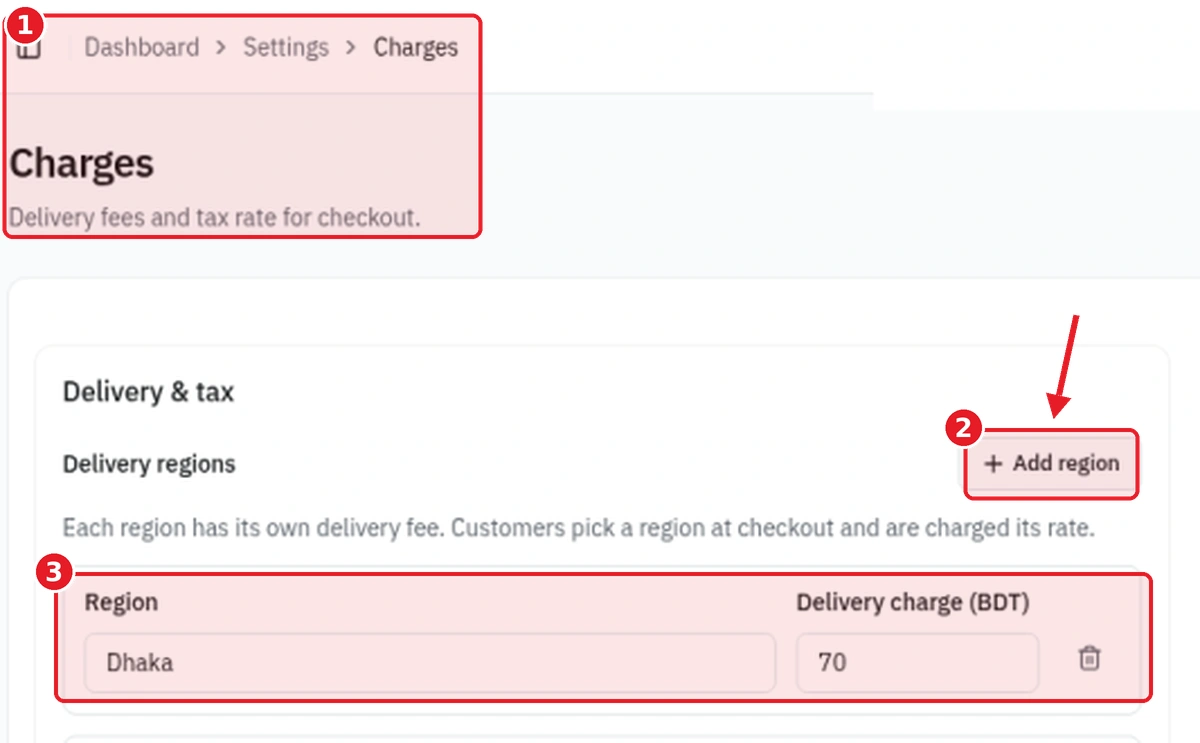
The numbers in the screenshot match the steps:
- The page header: you are on Settings, then Charges.
- The Add region button, to the right of the "Delivery regions" heading.
- The first region row, which holds a region name and a delivery charge.
Under the heading, the console explains how it works: each region has its own delivery fee, customers pick a region at checkout, and they are charged that region's rate.
Step 2: Read the region rows
Every row has the same three parts.
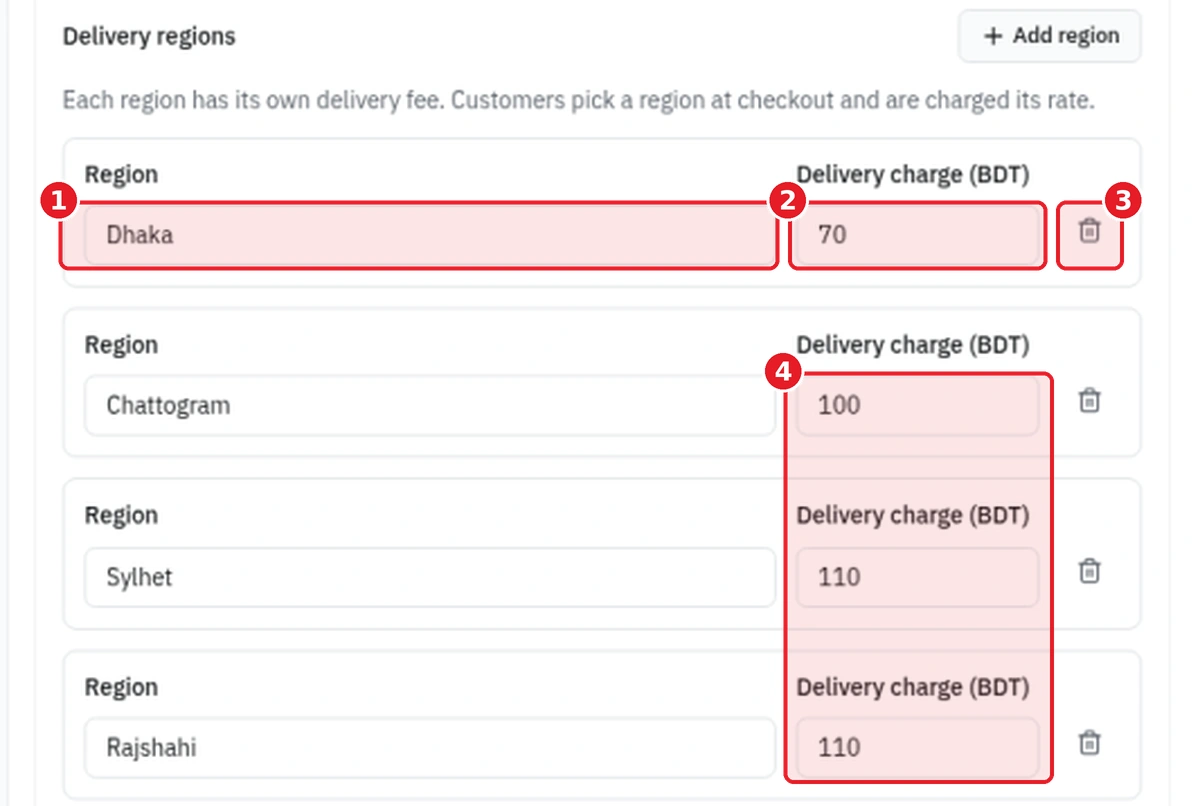
- Region is the name the customer picks at checkout. In the sample store the first row says Dhaka.
- Delivery charge (BDT) is the fee for that region, in taka. Dhaka is set to 70.
- A trash icon sits at the end of each row.
- The charge fields of the rows below show that regions can have different fees: Chattogram is 100, and Sylhet and Rajshahi are 110.
The full sample list looks like this:
| Region | Delivery charge (BDT) |
|---|---|
| Dhaka | 70 |
| Chattogram | 100 |
| Sylhet | 110 |
| Rajshahi | 110 |
| Khulna | 110 |
| Barishal | 110 |
| Rangpur | 125 |
| Mymensingh | 110 |
Step 3: Set the Dhaka fee
Dhaka is the first row. Click the Delivery charge (BDT) field in that row and enter your inside-Dhaka fee. This is the number most of your city customers will see, so it is the one worth checking against your courier panel.
Step 4: Set the fee for each outside-Dhaka region
Work down the list. For each division you ship to, make sure the region name is right and enter its fee in the Delivery charge (BDT) field.
You do not have to give every region a different price. The sample store charges the same amount for five regions and a different amount for Chattogram and Rangpur. If your courier charges one rate for everywhere outside the capital, you can simply enter the same number in each row. That matches the inside-versus-outside split most Bangladesh sellers use.
Step 5: Add a region you are missing
If a place you deliver to is not in the list, click Add region, then fill in the region name and its delivery charge in BDT, the same two fields every other row has.
Keep names short and clear, because customers pick from them at checkout. A name like "Chattogram" is easier to choose than a long description.
Step 6: Check the tax rate
Scroll to the bottom of the page. Below the region rows you will find Tax rate (%), with the note "Applied on the subtotal of every order." In the sample store it is set to 0.
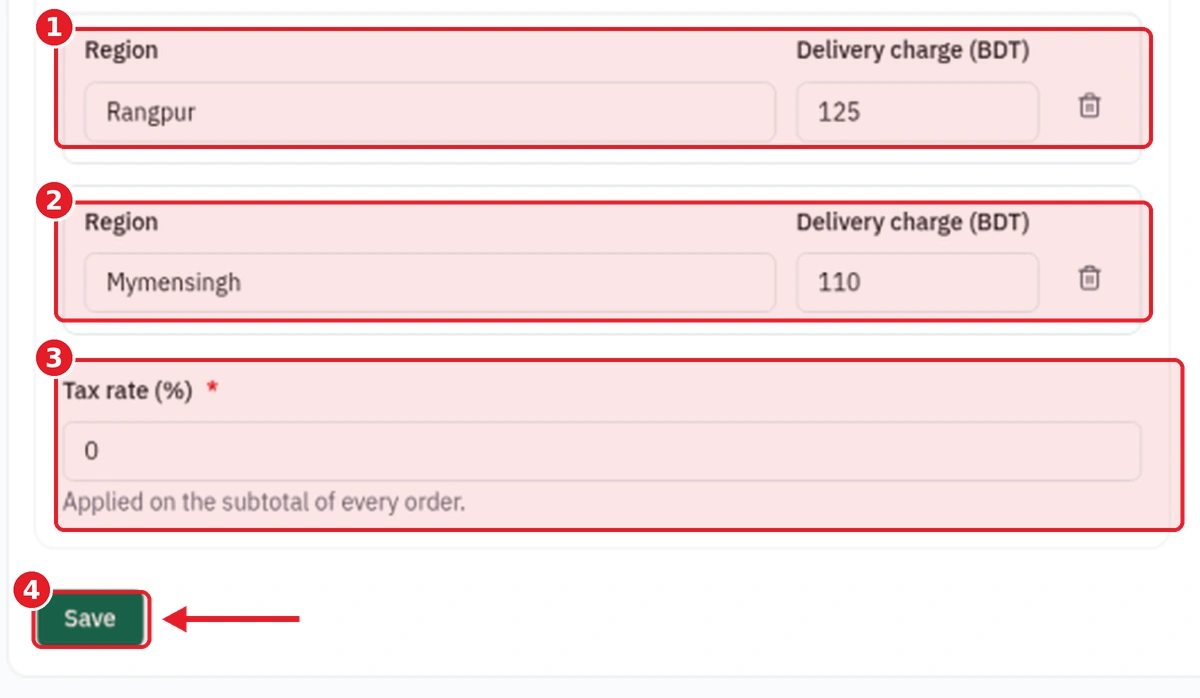
- The Rangpur row, set to 125.
- The Mymensingh row, set to 110.
- The Tax rate (%) field, with the note that it applies to the subtotal of every order.
- The Save button at the bottom left of the card.
The field is marked as required, so do not leave it blank. If you do not charge tax, the sample store simply has 0 in the field. If you are unsure what applies to your business, ask your accountant before changing it.
Step 7: Click Save
When your fees and tax rate look right, click Save. Do this after you finish all your edits.
Step 8: Check it as a customer would
Open your storefront, add a product to the cart, and go to checkout. Pick a region and look at the delivery fee. Then try a second region. Each should show the rate you entered. This takes two minutes and catches typos before a real customer does.
The same list also appears in the Delivery regions section of the Order flow page, which is where checkout settings live. If you are setting up checkout, see how to set up cash on delivery checkout in StoreOS.
Tips for choosing the numbers
- Start from your courier bill. Check your merchant panel for the real cost, then decide how much you pass on to the customer. See how to book Pathao and Steadfast from your orders.
- Remember returns. A failed COD parcel costs you delivery twice. When a COD parcel comes back covers what that does to your margin.
- Keep it simple. Two or three price levels are easier to explain than eight.
FAQ
Where do I find delivery charges in StoreOS?
In the console under Settings, then Charges. The page is titled "Charges" and covers delivery fees and the tax rate for checkout.
Can I charge different fees for different divisions?
Yes. Each region has its own row and its own Delivery charge (BDT) field, so you can set a different amount for each.
How do I add a new region?
Click Add region next to the "Delivery regions" heading, then fill in the region name and delivery charge.
Is the fee shown in taka?
Yes. The field is labelled Delivery charge (BDT), so you enter the amount in taka.
Do I need to click Save?
Yes. Click Save at the bottom of the page after you finish editing.
Set your delivery charges today
Delivery fees are one of the first things a customer sees at checkout, so it is worth getting them right before your first order. Create a free store, open Settings, then Charges, and enter your Dhaka and outside-Dhaka rates. Plans and what each one includes are on the pricing page.
Related reading
- How to manage stock in StoreOS: on hand, available and low stockStock management for an online store in Bangladesh: read the StoreOS Stock page, tell on h…
- How to set up cash on delivery checkout in StoreOSCash on delivery online store setup in Bangladesh: use the StoreOS Order flow page to set …
- Best ecommerce platform in Bangladesh: how to chooseChoosing the best ecommerce platform in Bangladesh? Use this 12-point checklist: COD, cour…